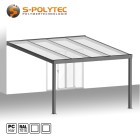
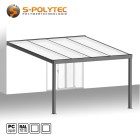
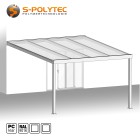
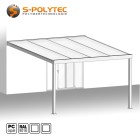
Configure customised terrace roofs online at low cost
Buying terrace roof online has never been so easy. You choose the model you like best in terms of colour and roofing and configure the desired width, depth and profile shape according to your requirements. After just a short time, you will receive your aluminium terrace roof in your desired configuration with all the assembly materials for self-assembly.
Your advantages with terrace roofs from S-Polytec
- Our customised terrace roofs can be configured from 3x2 metres to 12x5 metres
- The aluminium terrace roofs are available in anthracite or white powder coating
- Depending on the design, the terrace roofs are approved for snow load zone 1 and snow load zone 2
- We offer roof coverings made of polycarbonate or safety glass for our terrace roofs
Terrace roof anthracite (polycarbonate transparent)
 from €1,099.00
Incl. 19% Tax
Terrace roof anthracite (opal polycarbonate)
 from €1,131.00
Incl. 19% Tax
Terrace roof white (polycarbonate transparent)
 from €1,339.00
Incl. 19% Tax
White terrace roof (polycarbonate opal)
 from €1,340.00
Incl. 19% Tax
Concrete base with drainage
 €77.00 / pcs
Incl. 19% Tax
Concrete base without drainage
 €77.00 / pcs
Incl. 19% Tax
Configure customised patio covers online
Design your new feel-good space conveniently online at favourable prices!
With our patio roofs, you can configure your new patio roof entirely according to your wishes with three simple clicks. We not only offer the canopies in different colours, but also with different sheets for covering, from lightweight plastic sheets made of five-layer double-skin polycarbonate sheets or toughened laminated safety glass. You can also choose from two different designs. This means we are guaranteed to have the right roofing solution for every taste, every budget and every patio.
Our canopies are designed for maximum quality and durability. The favourable price for your canopy is the result of clever purchasing and low storage costs. Thanks to a well thought-out, modular system, the roofs can be easily and flexibly customised in terms of size configuration and are just as easy to assemble. See for yourself and take a look at the assembly instructions. You will realise that no expensive special tools or extremely high level of manual skills are required.
What is a patio cover?
Our customised patio roofs are constructions for single-sided wall mounting, which can be used both as a patio roof in the garden and to cover the entrance to the house or for use as a carport. These consist of a basic frame made of high-quality aluminium profiles, which are extremely suitable for such purposes due to their outstanding corrosion resistance, as well as their very good rigidity and load-bearing capacity. There are three basic types of roofing to choose from. From light polycarbonate in transparent or milky, opaque, opal polycarbonate to sheets made of laminated safety glass in clear, the right covering is available for every taste. The polycarbonate sheets are 16 mm double-skin sheets. The tempered safety glass sheets, on the other hand, are only half as thick at around 8 mm, but are significantly heavier.
- We offer patio roofs in the two most popular colours anthracite and white
- You have the choice of three different coverings made of laminated VSG safety glass or polycarbonate
- The patio covers can be configured up to 12 metres wide, depending on the design
- We offer patio roofs with an overhang of 2 metres to 5 metres (4 metres VSG glass)
- All panels are cut exactly to size and supplied to simplify installation
- Slim design can be selected in various profile designs (angular or rounded)
NOTE: For patio roofs up to 6 metres, all profiles are supplied in the appropriate length. For wider canopies, simple adjustments are necessary by shortening the wall connection profile, the drainage channel and the decorative panel.
What is included in the scope of delivery of a patio cover?
Put simply, the delivery of your patio roof includes everything you need for professional installation. Starting with the wall connection profile, the support posts, the gutter and the rafters, all cover profiles, the complete drainage system, waterproofing material, and, of course, the roofing panels are also supplied. In addition, all the necessary screws, even the knock-in plugs for installing the wall connection profile, are supplied so that you can start installing your new roof immediately. You can download the installation instructions for the roofing at any time from the corresponding product page. There you will also find detailed information on the tools required for installation and for fitting the support posts and coupled profiles (applies to roofs over 6 metres wide).
Once you have selected your roofing product in terms of covering and colour in this category, you are free to choose the configuration of your dream roof. In addition to selecting the width up to 6 metres (or from 6 to 12 metres) and the depth up to 5 metres, you can also specify the design of the decorative profiles. There are various designs to choose from here. With the "square" option, all profiles, support posts and decorative mouldings are square. In the rounded version, the support posts are clearly rounded at two of the four corners. The decorative profile for covering the drainage channel is also curved rather than straight and is finished on the outside with matching cover caps. To give you a better idea of the different designs, images of the available designs are included with all products. Changing the design option has no effect on the price. Your personal taste is the sole deciding factor here.
As the width of your configuration increases, so does the number of certain components. These include the internal rafters, one of which is always supplied less than the total width of the roof. For a 5.06 metrex3.50 metre patio roof, two side rafters are therefore always supplied for installation at the left and right outer ends and an additional four inner rafters, which are inserted between the individual polycarbonate or glass panels. The logical consequence of this is that a rafter cover is also supplied for each rafter. As these are identical for the side and inner rafters, the delivery quantity for polycarbonate covers always corresponds to the width in metres plus one. In our example, this would therefore be six clamping profiles for covering the rafters. The rubber seals, which are inserted into the guide groove in the rafters and covers for sealing, are logically longer as the width and depth of the roof increases. The inner click panels, which are hooked between the individual rafters to cover the wall connection profile and the drainage channel for visual enhancement, as well as the number of panels for the roof covering, the end brackets for fixing the inner rafters at the front, and the screws required to securely fasten everything also depend on the width and are included in the required quantity.
The components of the patio cover
- Wall connection profile in the selected width
- Drainage channel in the selected width
- 2 side rafters at the selected roof depth
- Internal rafters at the selected roof depth
- Number of support posts required
- Base plates for bolting the support posts
- Front decorative profile for drain channel in the selected shape and width
- Condensation profiles (935mm) for covering the wall-side panel edges
- Condensation profiles (980 mm) for covering the edge of the channel on the panel side
- Roof covering (depending on the design of the patio cover)
- Inner click panels as a cover between the rafters
- Left end cap for drain channel and decorative profile in the selected shape
- Right end cap for drain channel and decorative profile in the selected shape
- 2 end caps for the wall connection profile
- PVC downpipe for drainage in the support post
- 90° PVC bend as drainage outlet
- Reducer from downpipe to bend (or optional concrete base))
- Drainage grille for downpipe
- Leaf catcher for the drainage channel
- Rubber seals for the rafters and rafter cover profiles
- Rubber seals for the condensation profiles of laminated safety glass
- Rubber seal for the wall connection profile
- End bracket for fixing the internal rafters
- Impact dowel Ø 8x60mm for wall mounting
- M8x30mm threaded screws with washer
- Unpainted screws Ø 4.2x16mm (self-tapping)
- Unpainted screws Ø 6.3x25mm
- Lacquered screws Ø 4.2x16mm (self-tapping))
- Lacquered head screws Ø 4.8x38mm
- Alkoxy silicone in matching RAL colour
Depending on the size configuration, profile reinforcements are also supplied, which allow us to increase the spacing between the support posts and also contribute to a higher load-bearing capacity of the roofing. This may be necessary for very deep roofs with a high roof overhang, but also for the heavier glass panels used as roofing. However, these reinforcements are always cut to the right length for you so that you have an easy job, as the additional profiles are simply inserted into the hollow chambers of the gutter or the rafters.
Certain configurations, especially with very wide patio covers, require the wall connection profile, drainage channel and front decorative profiles to be divided. This may be necessary for structural purposes, but also due to the maximum production length when manufacturing the profiles. In such cases, the corresponding profiles are always supplied in the best possible size of the same length, but slight adjustments are necessary. However, this is limited to the wall connection profile, the front trim panel and the drain channel, which can be easily shortened to the final size by a simple cut with a suitable saw. To ensure a pleasing, symmetrical appearance of the roofing, all profiles should be shortened equally. In order to connect these profiles precisely and securely, the necessary additional material, consisting of additional screws and sealing material, is always included.
Configuration-related additional scope of delivery
- Steel reinforcement strut for the drainage channel
- Reinforcement profiles for the inner rafters
- Y-profiles for rafter sealing with VSG glass coverings
- Special adhesive tape for sealing cut edges of polycarbonate
- Special adhesive tape for connecting split drainage channels
- Adhesive sealing tape for sealing split drainage channels
- Precast concrete plinth with integrated drainage
- Precast concrete plinth without integrated drainage
- LED lighting as a complete set with remote control
- Individual extension cables for LED lighting
- Individual LED spotlights and accessories to complement the set
- Panoramic sliding glass walls (initially only on request)
- Mounting the wall connection profile on the masonry
- Positioning the support posts and shortening if necessary
- Fitting the channel to the support posts
- Fitting the side rafters to the wall connection profile and outer support posts
- Preparing, inserting and screwing the internal rafters
- Preparing and inserting the transparent polycarbonate sheets and rafter covers
- Installation of the internal drainage
Optional accessories for patio roofs
With our optional accessories for our patio covers, you can create your own personalised outdoor living experience. Our discreet LED spotlights, which we offer in various housing colours to match your patio roof, provide a cosy, warm light on a pleasant summer evening. With our panoramic sliding walls made of safety glass, you can enjoy cosy moments on the patio even in autumn weather and are protected from wind and rain.
NOTE: Lighting, sliding glass walls and cable awnings can also be retrofitted to existing patio roofs under certain conditions. However, the effort required for installation and assembly can vary from manufacturer to manufacturer. You can find more information on this in the relevant category or in the product description of the accessories.
How the patio roof is delivered?
The decision has been made and you have realised your dream of a patio roof thanks to our simple configuration. But what happens now?
What is done for you with just a few clicks when configuring the patio roof now means precision work and care for us. Based on the length and width of your roofing, all aluminium profiles relating to the depth of the roofing are cut to the required dimensions. We attach the utmost importance to dimensional accuracy so that there are no nasty surprises during installation and a smooth process is guaranteed. We also take particular care when working, as the aluminium profiles and covers are already powder-coated in anthracite or white and nobody wants to end up with a scratched patio roof.
We offer patio roofs with 3 different types of roofing. While the VSG (laminated safety glass) sheets are already available in all depths, the polycarbonate double-skin sheets are cut exactly to your length. Specialised panel saws with CNC control and an air table ensure very surface-friendly processing with precise, right-angled cutting. A protective film protects the panels from damage during cutting, transport and preparation for installation. This must of course be removed before the panels are installed.
Once all the individual parts have been cut to size for you in the appropriate quantity and design (colour, profile shape and covering), they are carefully packed and delivered by our forwarding agent.
NOTE: Please ensure that a suitable storage area can be provided for the delivery of the usually long profiles so that they can be unloaded without complications.
What needs to be considered before installing the patio roof?
Nature of the wall
The canopy is attached to one side of the house wall. It is therefore only logical that the wall should also have sufficient strength and load-bearing capacity. The prerequisite for installing the patio roof is a solid installation base made of stone or concrete. The installation material supplied is also matched to this. With façade cladding made of HPL or fibre cement, thermal insulation composite systems or wood panelling, a little caution is required. On the one hand, the load-bearing capacity of the substrate must be guaranteed, but it must also be ensured that the roofing is anchored in the masonry behind it. If in doubt, this should always be clarified in advance with the builder of the façade cladding or insulation, who can provide information about the permissible loads. The problem of wall installation is less pronounced with hollow blocks. Only the impact anchors should then be matched to the respective substrate to ensure a permanently firm and secure installation so that the anchoring in the wall does not become loose or even completely detached over time.
Soil condition
The condition of the ground is another very important aspect when erecting a patio cover. This should have sufficient strength in the area of the support posts so that the roofing does not sink into the ground over time. Appropriate preparatory work, such as compacting the soil or pouring a concrete foundation on which the support posts are mounted, ensures that the roofing can be guaranteed to stand securely even when subjected to additional snow. In addition, the roofed area should be reasonably even. Too steep a gradient from the wall to the front of the support posts, as well as between the posts, is not only uncomfortable for the use of the canopy, but can also mean that the support posts with a total length of 250cm are no longer sufficient to compensate for the gradient. When installing the support posts directly on the decking of the patio cover, it must be ensured that it can withstand the weight and that the bedding of the decking is also sufficiently compacted to prevent the paving or decking boards from sagging.
Regional snow load zone
Depending on the type of roofing and size combinations, structural calculations are available for our patio roofs for use in snow load zones 1 or 2. Which specific configuration is approved for which snow load zone can be viewed after configuration in the additional information on the product page. Please note that the specified snow load zone must not be exceeded. Otherwise, not only will the warranty be invalidated, but there is also a risk of damage to property and personal injury, as excessive snow loads can affect the stability of the canopy. In the event of unexpectedly heavy snowfall, safety measures should be taken to relieve the load on the roof, for example by clearing away the snow.
Installation of our aluminium patio roofs
A look at the assembly instructions for our patio roofs shows that the assembly of the roof is not rocket science and can be carried out by anyone who does not have the proverbial two left hands. The tools required for assembly are also straightforward. Only a cross-cut and mitre saw for adjusting the support posts to the desired passage height will probably not be available in every household, but in case of doubt a simple hand-held circular saw with a suitable saw blade will suffice. Apart from the assembly tools, which are also listed again at the beginning of the instructions for the sake of completeness, all individual parts are included in the scope of delivery, starting with all profiles and covers, through the roof covering to rubber seals, sealing tape and sealants, as well as all necessary screws for wall fastening and assembly of the individual components.
All profiles, covers and plastic sheets for roofing are supplied in the exact length required for roofs up to 6 metres wide based on your configuration. Exceptions are the support posts, which have to be shortened due to personal preferences with regard to clearance height and any unevenness in the ground. For wide patio roofs where the maximum profile length of 6 metres is exceeded, the corresponding profiles consist of two or, for structural reasons, three individual elements. However, this may only affect the wall profile, the gutter and the front cover. These must also be adapted to the final dimensions by cutting them to size. In this case, all components for connecting the profiles and sealing the joint edges are supplied as standard.
Assembly is carried out with the help of the detailed and illustrated instructions in seven essential steps, which are repeated a different number of times depending on the size of the patio cover. The number of posts, twin-wall sheets and rafters varies depending on the depth and width of the patio cover.
7 steps to a covered terrace
More or less complex preparations are required for each of these installation steps. These include, for example, determining the installation height of the wall connection profile, depending on the desired clearance height between the support posts. To simplify this, however, we have created a clear table for you/ The table can be found at the end of the instructions. There is also a large illustration for the position of the support posts in the centre section of the instructions. Both for the distance to the wall and for the distance between the respective posts. The procedure for preparing the rafters is always identical, regardless of the number, so that only the sealing rubbers need to be inserted and cut with a 30 mm overhang. Depending on the design, an additional reinforcement must be inserted into the profile and screwed in place. Preparation of the internal rafters also includes the integration of the optional lighting, but this is also limited to marking and drilling the holes for the recessed spotlights, as well as pulling through the cables with plug connections. The double-skin sheets, cut to the desired size, must be sealed at the front with adhesive tape and connected with end profiles before they are placed on the aluminium construction and fixed in place with the cover profiles. This is a well-thought-out system that is simply pressed in (if necessary with light taps with a rubber mallet) and secured at the front end with an angle profile to prevent loosening. On the wall side, it is secured via a profile projection to prevent the rafter cover from coming loose.
What advantages does powder-coated aluminium offer
Not all paintwork is the same. Particularly with very inexpensive simple roofing, the quality of the paint is often skimped on. This can of course become noticeable over time as darker colours fade or light-coloured paints turn yellow. Depending on the colour quality and the intensity of the UV radiation, this can leave unsightly marks after just a few weeks, but also after a few installations or a few years. Good quality does not necessarily have to be expensive, as our patio covers in anthracite or white prove.
Our quality promise? 10-year guarantee on colour fastness to weather!
Our patio covers are made of high-quality aluminium, the surfaces of which are finished with a high-quality powder coating. Here you can choose between a strong anthracite grey (RAL7016) and a radiant traffic white (RAL9016). Using powder coating, the colour is applied to the surfaces in powder form using a special process. Exposure to high temperatures creates a homogeneous layer of paint that proves to be extremely resistant. The silky matt, smooth paint is extremely UV and weather resistant. However, this is also a mandatory requirement for a patio cover, as it should ultimately help to ensure that the patio can be used in all weather conditions and protect people, plants and patio furniture from sun, rain, snow and hail. Nobody wants the paintwork to yellow or fade, so we consciously focus on quality here. Because we know how good and durable the powder coating on the profiles of our patio roofing is, we offer a 10-year guarantee on colour fastness to weathering during painting, so you can sit back and relax.
WARNING: Even if a powder coating is robust and resistant, harsh cleaning agents or abrasive cleaners can damage the paint layer. Abrasive sponges that are too hard are also not suitable for cleaning the profiles. Instead, we recommend using a mild soap solution and a soft cloth. Alternatively, the uprights and struts can also be sprayed with a high-pressure cleaner at a sufficient distance.
Glass or polycarbonate - which is better?
Whether you choose laminated safety glass or polycarbonate for your roofing depends primarily on your personal preferences. However, each sheet has its own specific properties with all their advantages and disadvantages, which we naturally do not want to withhold from you.
Let's start with the similarities between the different sheets available for roofing. The main focus here is on resistance to weathering and temperature resistance, as the roofing is located outdoors and must be able to withstand all weather conditions without compromising the service life of the sheet. Because we rely on a UV-stabilised type of polycarbonate, which is characterised by very good UV and weather resistance, these are in no way inferior to sheets made of laminated safety glass. The temperature resistance of the plastic covering is also more than sufficient for our latitude and even reaches up to +120°C. Even strong temperature fluctuations do not have a negative effect. Thanks to the special structure of the 5-fold reinforced double-skin sheet, the sheet is extremely resilient and stable. In fact, polycarbonate is even a shatterproof plastic, making it the perfect alternative to glass sheets and, with a weight of around 2.4kg/m 2is an extremely lightweight covering compared to the considerably heavier sheets of solid laminated safety glass. The latter, on the other hand, has the advantage of a much more scratch-resistant surface. However, as the sheets are hardly subjected to any physical stress as roof coverings, scratches on the top of the roof are hardly to be expected anyway.
Further significant differences arise in the light transmission of the various slabs. The higher the light transmission value, the brighter it is on the patio and the living room with access to the patio is also flooded with light. At 88%, this is highest with laminated safety glass. With the transparent double-skin sheets, the value of 70% is still in a high range, so that even on cloudy days there is still sufficient light without the need for additional lighting. The opal version of the polycarbonate sheets reduces the incidence of light the most. Here, however, 55% of the incident light is still transmitted. However, due to the scattering of the diffuse, opaque sheets, this does not have as significant an effect as the pure figures would suggest and even has the advantage that you are less intensively dazzled in strong sunlight.
Another aspect is not least the price. Although laminated safety glass has some advantages in direct comparison, it is also significantly more expensive than a comparable covering with double-skin sheets. It would be cheaper to use simple glazing made of conventional glass, but this would be at the expense of stability, load-bearing capacity and breakage resistance, which is why the use of normal glass for patio roofs is not intended and laminated glass must be used as a roof covering.
NOTE: In contrast to other types of roofing, our roofing with safety glass approved for zone 2 snow loads is not 980mm wide, but only 720mm. Depending on the size configuration, the outer glass panels can even have a width of only 640mm. However, this information is detailed in the installation instructions as well as in the additional information in the product description and within the product description itself.
What do the snow load zones mean?
In contrast to rain, which can easily run off via the gutter and the integrated drainage system due to the roof pitch, snow remains on the roof and must therefore also be taken into account in the maximum roof load. In some areas of Germany, hardly any significant amount of snow falls. In other regions, especially at high altitudes, prolonged snowfall can contribute to increased snow pressure, so that the structural load assumptions regarding the snow load for the construction of a roof must be taken into account, regardless of whether it is a warehouse, detached house or patio roofing.
In simple terms, the snow load zone is determined on the basis of past weather data from the last 50 years. Other relevant influencing factors are the local climate zone and the topographical altitude. We wouldn't be in Germany if there wasn't a standard for this and in fact DIN EN 1991 regulates the effects on supporting structures. Part 1 - 3 (General actions, snow loads) sets out the principles for determining the values for snow loads for the calculation and design of buildings and civil engineering structures. However, this section of the standard is limited to structures, which actually include terrace roofs that are erected at a topographical height of no more than 1500 metres above sea level. However, not everyone can boast a degree in engineering and correctly interpret the usually complexly formulated DIN standards, so it is very helpful to orientate yourself a little using a map that indicates the snow load areas. If you want to be on the safe side, the website www.schneelast.info can be used to determine the snow load and thus also the snow load zone based on the postcode and save it as a PDF file. The DIN standard is not valid for other countries. Here, the snow load zone must be determined before installing a roof.
Our patio roofs are all approved for areas with snow load zone 1. This means that the roofs can be used without any problems in the Middle Rhine Valley, the Lower Rhine Plain, and the entire Netherlands and Belgium, for example.
All our customisable patio roofs with laminated safety glass are approved for snow load zone 2!
Our patio roofs with safety glass coverings are also approved for snow loads in zone 2, meaning that large parts of Germany are covered. Of course, there are still some regions with higher snow load zones, such as the Black Forest, the Sauerland, the Harz Mountains, the Alps and the Bavarian Forest. Even some size combinations with double-skin polycarbonate sheets can be used in areas in snow load zone 2. The colour of the sheets is irrelevant. It therefore makes no difference whether you opt for transparent or opal polycarbonate sheets for your roofing. This usually applies to patio roofs with a shallower depth, but there is no rule of thumb here either. For example, a patio roof in anthracite with a width of 6 metres and a depth of 2 metres is not suitable for zone 1. With the same width and a depth of 2.5 metres, however, it is. After selecting the width and depth of your desired configuration, you can determine the permissible snow load zone in the additional information for the respective roofing.
NOTE: Is the desired canopy not suitable for your snow load zone? This is usually not a problem, because with a few adjustments, most canopies are also available for regions up to snow load zone 2. Simply write to us and we will check the feasibility and provide you with a free quote for your desired roof.
Terrace roofing as an energy-saving miracle
A patio cover can certainly contribute to increasing the energy efficiency of a property. This may sound a little surprising at first, but the explanation makes it clear. A significant factor in energy costs is due to the insulation of the façade and windows. A good value means that less heating is required on cold days, while the living space does not heat up so quickly in summer, so that any cooling of the living rooms and bedrooms requires less or no use of ventilators or air conditioning units.
A patio cover reduces the direct sunlight that hits the façade and window front, especially in summer. This so-called energy transmittance (not to be confused with light transmittance), which varies depending on the type of roofing, also helps to ensure that the patio remains pleasantly cool and that the living room does not heat up so quickly. Energy transmission is highest with clear glass at 85%. With transparent polycarbonate, the attenuation is significantly lower with a value of 62%, while opal polycarbonate only has an energy transmittance of 54%. As a result, opal roofing (alternatively frosted glass) provides the best protection against heat build-up under the terrace.
What is a blessing in summer can also be a disadvantage in winter, as the warm rays of the sun always heat up the façade and the interior a little, even in winter. With a lower energy permeability, this factor is significantly reduced. Nevertheless, a canopy always improves energy efficiency in winter too, as the heat accumulates under a canopy so that the cold cannot directly affect the façade below. Although this only makes a difference of a few degrees, it can help to ensure that the heating does not have to work quite as hard to reach the desired cosy temperature, especially at low temperatures. If the patio roof is also fitted with sliding glass elements all the way round, closing it can again significantly reduce the heating output, as the enclosed space does not cool down as much due to the wind.
TIP: With a cable awning, which is installed between the rafters, you can combine the advantages of a clear glass roof in winter with optimum shading in summer. This allows you to utilise the smallest ray of sunshine in winter and provide a shady spot in summer.
Care and maintenance of a patio roof
With our patio roofs, we attach great importance to making your life as easy as possible so that you can enjoy your roof without restrictions and use your patio protected from any weather and in any season. For this reason, we only use aluminium patio roof constructions, which are considered maintenance-free due to their corrosion resistance and stability. The white or grey powder coating also has a positive effect on resistance to weather. There is no need to check the strength of the screw connections or regularly renew the coating to protect the surfaces. Clear advantage over wooden substructures.
Patio roofs are exposed to all weather conditions. Although this does not affect the longevity of the roofing, over time it can lead to the roofing becoming dirty or the profiles no longer appearing bright white. Causes include typical air pollution such as dust blowing over from the Sahara, leaf fall in autumn, bird droppings, etc. However, this is not a problem, as the next rain shower will wash most of it off the roofing and, if this is not enough, the roofing can also be cleaned very easily. The most effective method is to hose it down with a high-pressure cleaner. In this way, both the sheets and the aluminium profiles can be cleaned in a particularly gentle and environmentally friendly way without the addition of cleaning agents. Alternatively, cleaning with a soft cloth or sponge is also possible. Here too, we recommend clear water. For more intensive soiling, a little mild soap can also be added to the water. Scouring agents or aggressive cleaning agents, on the other hand, are not suitable and can have a negative effect on the silky matt lustre of the powder-coated surfaces and, in the worst case, even scratch them. The same applies to excessively hard scouring pads.
The drainage channel with concealed downpipe ensures adequate drainage even in heavy rain. If the drain or leaf catcher is blocked by leaves or other coarse debris, we recommend sweeping out the gutter with a simple hand brush and removing the leaves from the leaf catcher. Depending on the location of the canopy, this may be necessary more or less often, especially in autumn.